One of the worst nightmares of the Azure platform administrators is Accidental Deletion of Azure resources. Accidental deletions happen when the admins use wrong parameters in the IAC (Infra as Code) pipelines or manual errors.
Some of the Azure resources like Key Vault, Storage Accounts can be recovered from the portal or Azure CLI but many of the resources are difficult to recover and may need a Microsoft ticket.
Note: Azure “Do Not Delete” Locks are useful for preventing accidental deletion of resources in Azure. It is highly recommended to use Locks in Azure as a best practice.
In this article, we are going to discuss on the complete recovery of an Azure Virtual machine along with the hard disk, configurations and the NIC components.
There is often a misconception about the recovery of Virtual machines with all the files and configurations with respect to encrypted (Azure Disk Encryption) and non-encrypted Virtual machines. It is very much possible to recover the complete VM with the same VM name and all the data and configuration even for encrypted disks through Azure Backup Center in Azure Portal.
Recently we had an incident in which all of the resources in a resource group was deleted because of the wrong IAC trigger and the resources include a critical VM (disks were encrypted by ADE), function app, Webapp, Storage account and Storage account. While we could recover all the resources within 2 days, we had lot of miscommunication and cumbersome documentation on recovery of virtual machines with encrypted hard disks.
Through this article, we take you through a simple step by step method to recover a Virtual machine with all the data and configurations which had the disks encrypted by Azure Disk Encryption.
Pre-Requisites:
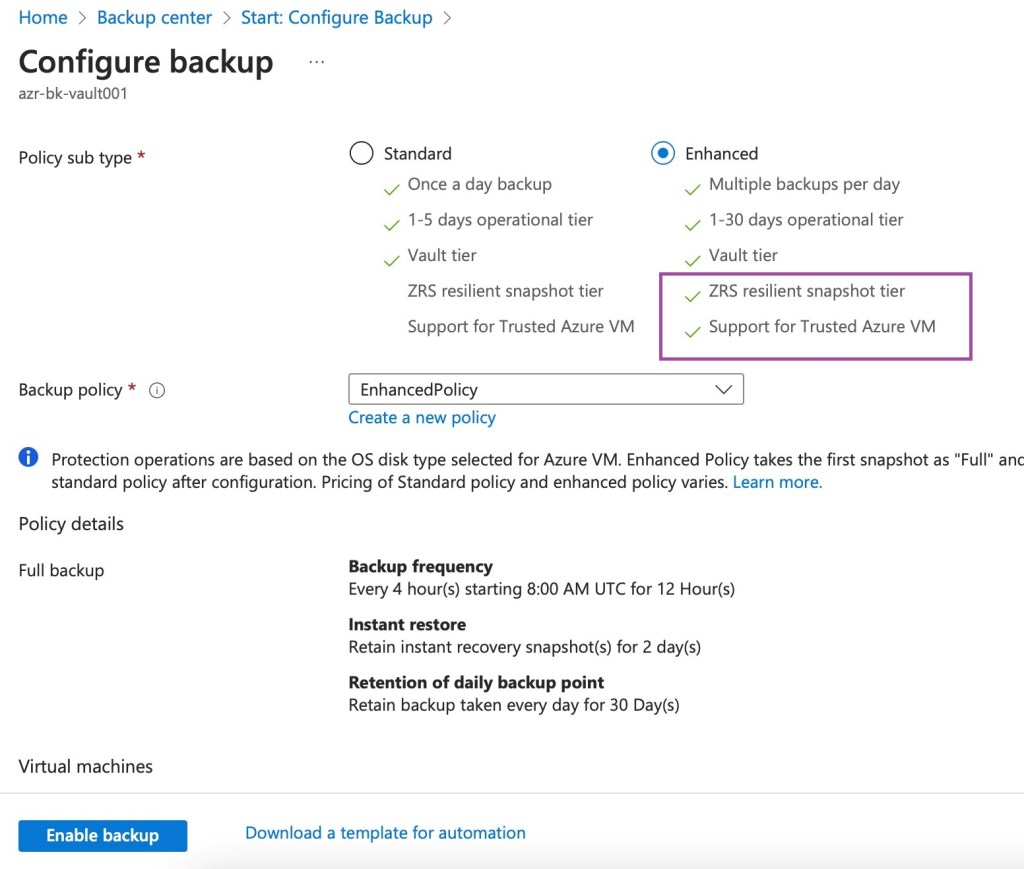
Virtual Machines to have a valid backup in the Azure Recovery Key vault with Enhanced Backup Policy.
Azure Storage Account as a staging location during recovery
Azure Backup Policy Types
Simulating Accidental Deletion:
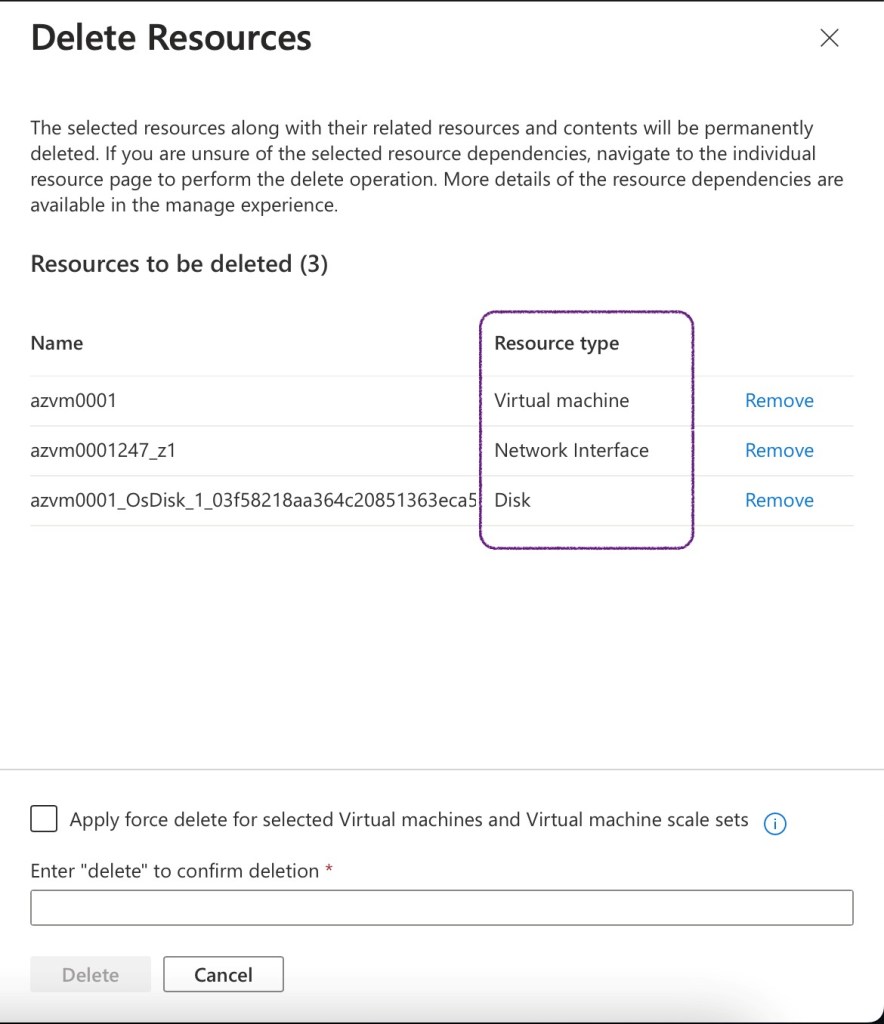
Here we are manually deleting the test Virtual machine (azvm0001) along with Virtual Hard Disk and NIC to simulate the scenario.
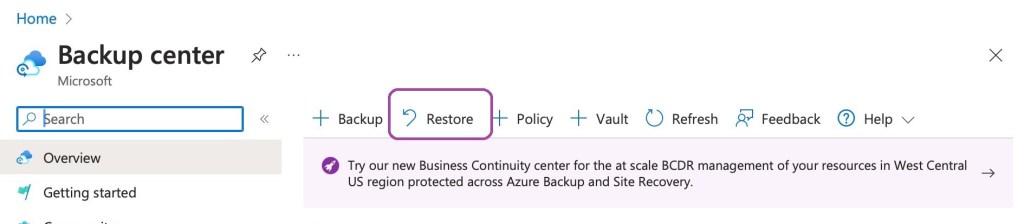
Steps to recover the accidentally deleted Virtual Machine in Azure:
Navigate to the Azure Backup Center and click on the “Restore” button.
Select the Backup Instance to be restored.
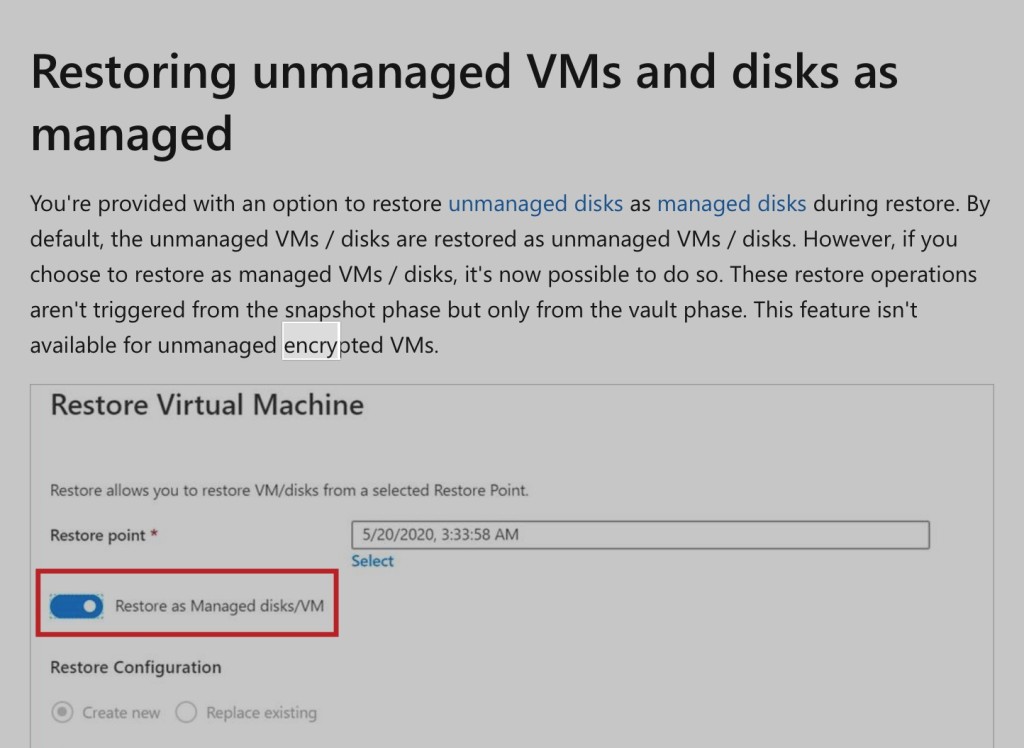
The next step is very important where only the Virtual Hard Disks get restored for encrypted disks and we need a storage account as staging location for the recovery disks.
Wait for the recovery to be completed and it approximately took 2 hours to complete in my lab scenario. The completion status shall be available in the Azure Backup Center as given below.
Now the Azure Virtual Disk has been restored successfully. Snapshot is given below.
From the Restore completed job in Azure Backup Center, proceed with selecting “Deploy Template” option as given below.
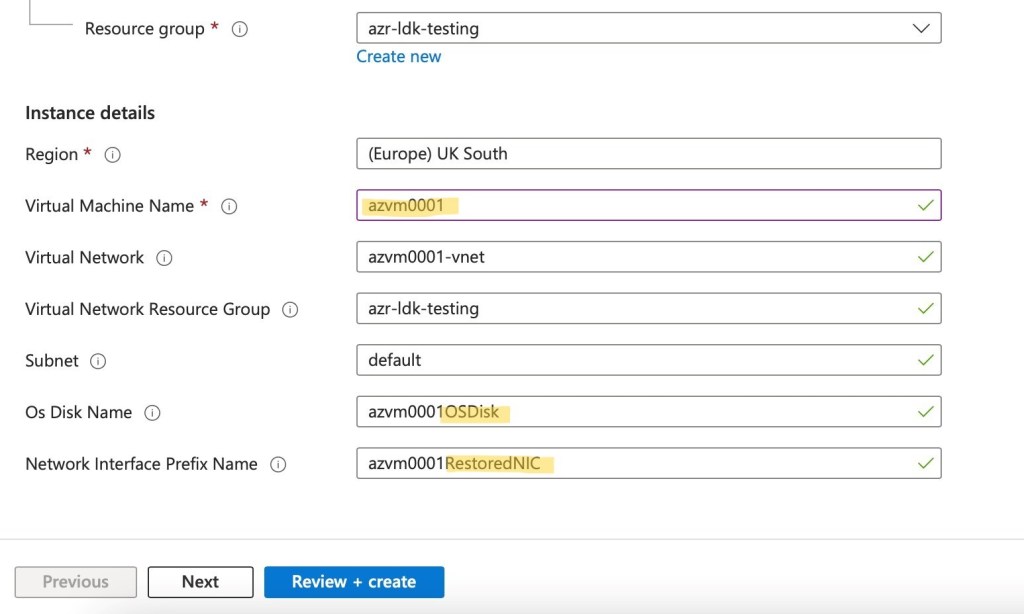
Proceed with the “Deploy Template” option and though the names of the virtual hard disks and the NIC are different with “restored” part of the names, we get the same disk and NIC properties. We can see the same name of the VM given for the restored VM as well.
Once we click on “Review+Create”, we get the restore job completed as given below and we have the Azure Disk Encryption status mentioned in the restore status as well.
While accessing the restored VM, the data and the configurations are intact which is a great news 😊 For the demo, we had a text file in the desktop and a Windows Task created in the Tast Scheduler before the VM was deleted. After restoring, we could see the data and configurations intact.
One of the key aspects in managing the costs in cloud is to consume cloud native solutions and not to replicate the On-Premises components in cloud. A simple example is to use Azure Bastion host PaaS (Platform as A Service) instead of traditional RDP server farms for remote connectivity to Virtual machines in all possible scenarios.
Windows OS Patching is one of the key areas in managing application and infra servers. The Infra team spends lot of time in keeping the servers up to date with critical and security patches. With malwares and ransomware posing serious threat to various organizations, it is imperative for the SecOps team to track the patching updates for all the servers in the environment.
Traditionally System Center Configuration Manager (SCCM) servers were used to keep the virtual machines up to date. Extending the same to Azure environment shall be cumbersome and adds the cost of product and management as well.
Hence the solution of Azure Update Management …
Azure Update Management:
Microsoft Azure offers a free cloud native solution based on Azure automation for patch management of Windows and Linux Virtual Machines (VM) in cloud
Azure Update Management helps to manage operating system updates for the Windows and Linux virtual machines in Azure, physical or virtual machines in on-premises environments, and in other cloud environments.
We can quickly assess the status of available updates and manage the process of installing required updates for the virtual machines reporting to Update management.
Azure Update Management – Schematic Diagram (Courtesy: MS Docs)
Scenario:
One of the common project scenarios is that the customers having Azure virtual machines in both workgroup and domain environment due to various requirements. Often the workgroup VMs patching is difficult and could lead to low Azure Secure Score and hence posing the immediate challenge to act and remediate the VMs missing critical patches.
Extending On-Premises SCCM servers or WSUS is used in few organizations which adds up to management and cost overhead. Azure Update Management comes handy in such use cases.
Advantages of Azure Update Management:
Works for both workgroup and domain joined VMs
Supports Linux and Windows VMs
Free of Cost
Scheduled deployments with no reboot option
Include or exclude selected patches with KB number
Pre and post patching tasks using scripts
Dashboard for easy reporting
Option to install critical and security patches and all other patches in same or different schedules
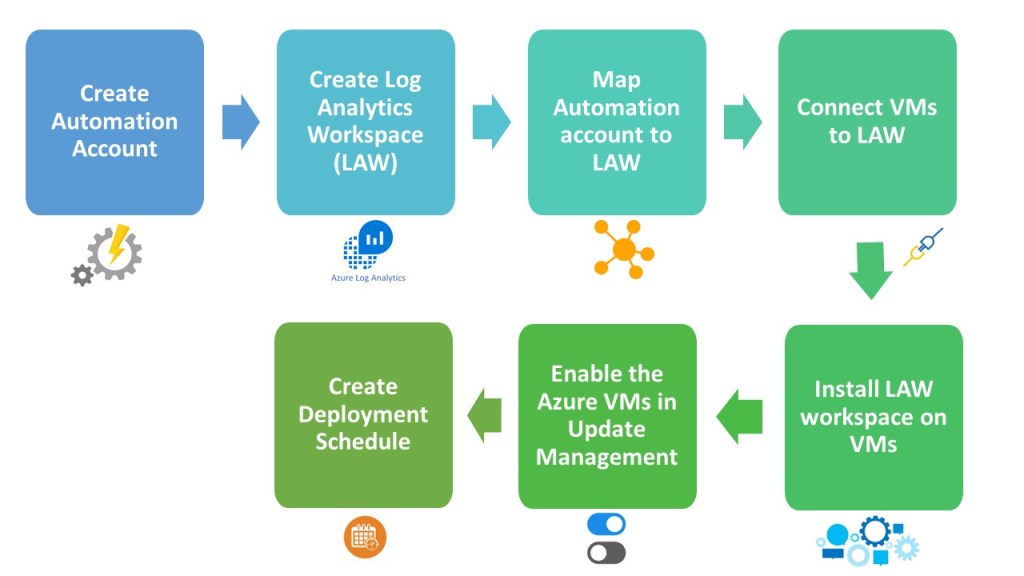
Components in Azure Update Management:
Azure Automation Account
Log Analytics workspace
Azure Automation Account:
Azure Automation delivers a cloud-based automation and configuration service that supports consistent management across the Azure and non-Azure environments. It comprises process automation, configuration management, update management, shared capabilities and heterogenous features. Automation gives you complete control during deployment, operations and decommissioning of workloads and resources
Log Analytics Workspace:
Azure log analytics workspace is the logical storage unit where log data is collected and stored. It can be considered as the basic management unit of Azure monitor logs. It is used to collect data from various sources such as Azure Virtual machines, Windows or Linux virtual machines, Azure resources in a subscription etc.
Implementation Workflow:
Workflow
Supported Operating System:
Windows:
Windows Server 2019 (Datacenter/Standard including Server Core)
Windows Server 2016 (Datacenter/Standard excluding Server Core)
Windows Server 2012 R2(Datacenter/Standard)
Windows Server 2012
Windows Server 2008 R2 (RTM and SP1 Standard)
Linux:
CentOS 6, 7, and 8
Oracle Linux 6.x, 7.x, 8x
Red Hat Enterprise 6, 7, and 8
SUSE Linux Enterprise Server 12, 15, and 15.1
Ubuntu 14.04 LTS, 16.04 LTS, 18.04 LTS, and 20.04 LTS
Update Management does not support safely automating update management across all instances in an Azure virtual machine scale set. Automatic OS image upgrades is the recommended method for managing OS image upgrades on your scale set.
Step by Step Demo:
The first step is to have an automation account. This account does NOT need any additional privilege such as “Run As” permission to update the OS of Azure VMs. We need to plan the deployment in such a way that the Automation account resides in the desired Azure region
Creating Automation Account
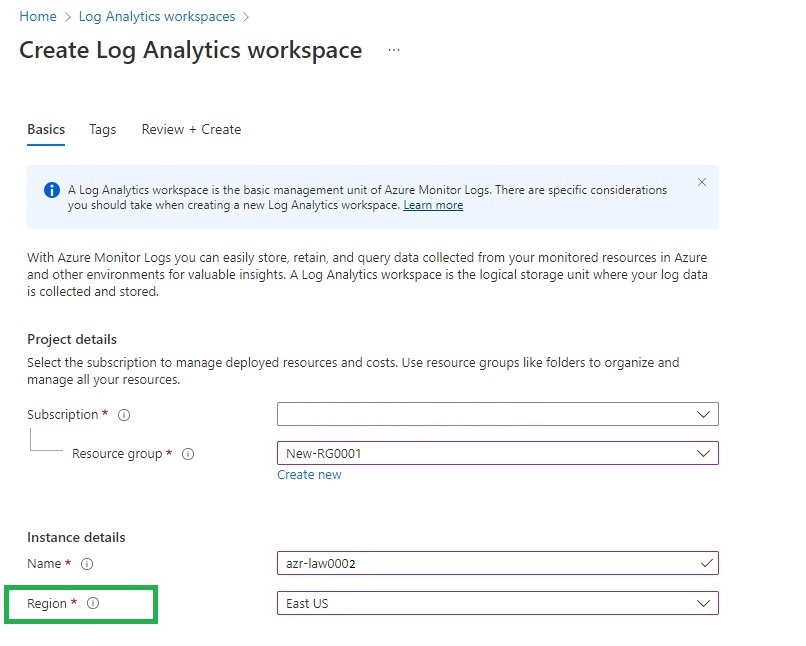
2. Then proceed with the creation of a Log Analytics workspace (LAW) account. The number of logs stored by the VMs in the LAW account is minimal and this is chargeable my Microsoft though update management is free. It is also very important to plan the same Azure region for the automation account and LAW account.
Creation of Log Analytics Workspace
3. Then proceed with mapping the Automation Account to the Log analytics workspace account.
Mapping Automation Account to Log Analytics Workspace Account
4. The next step is to connect the virtual machines to the log analytics workspace account. All the needed VMs and the automation account shall be connected to the same LAW account. Select the LAW account and then click on the VMs that need to be connected. This step can be automated using an Azure shell script.
VMs not connected to any LAW connectionConnecting one VM to the new LAW accountVMs connected to the LAW account
5. All the VMs shall communicate with the LAW account with the help of LAW agent. The agent can be installed on the VMs manually or automated. In this case, we are using “Auto-Provisioning” option under Microsoft Defender for Cloud -> Environment Settings -> Setting
Auto provisioning of LAW agent
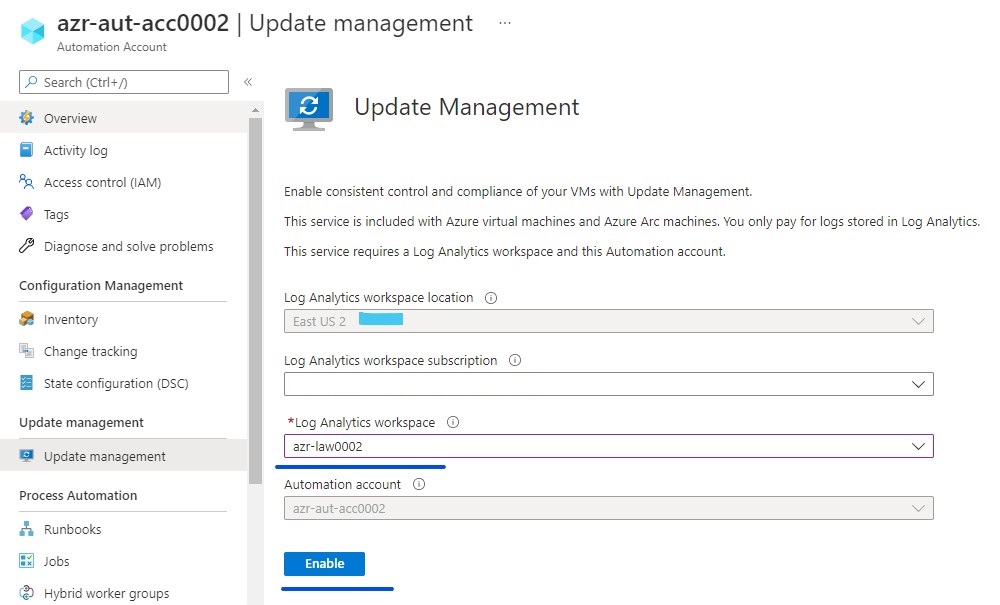
6. Now it is time to add the VMs into the Update Management section of the Automation account. Once added we can see the rich dashboard with information regarding the patching compliance and number of updates missing. However, this process shall take few hours and a VM which is shut down shall not report any data.
Adding VMs to Update ManagementUpdate management auto populates VMs based on LAW account mapped to VMs and Automation AccountAzure Update Management Dashboard
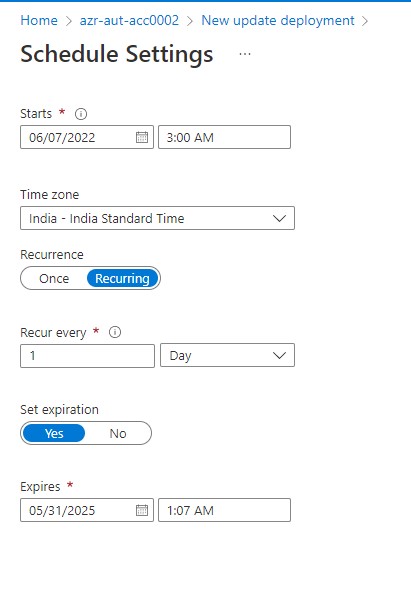
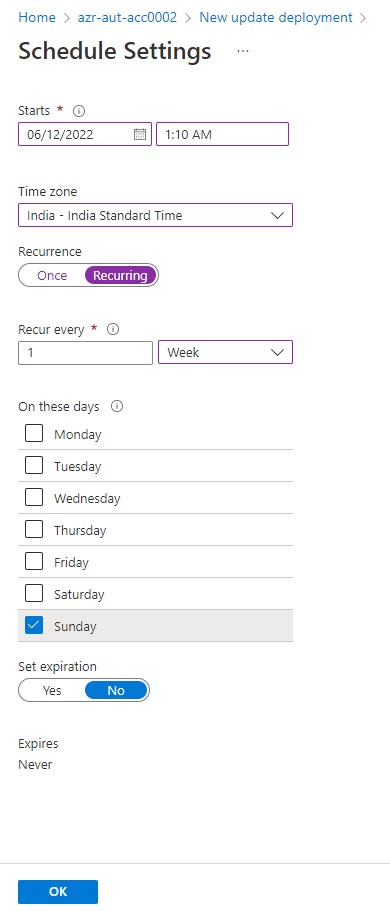
7. The last step is to create a deployment schedule as per the requirements. In my test case, I have a weekly recurring schedule for non-critical updates and daily recurring schedule for security patches and critical updates. The scheduling gives us a lot of flexibility to carry out pre and post patching tasks, include or exclude patches and the most important aspect of rebooting or no reboot of VMs post patching.
Creating a new update deployment scheduleDaily Schedule for Critical and Security UpdatesDaily Schedule Timing Option to select RebootWeekend Schedule for all other patchesDeployment SchedulesSnapshot of all executed JobsVMs marked compliant after the successful patching by Azure Update Management
Thus we have covered the entire demo of a simple deployment of Azure Update Management. Apart from Azure Update Management, MS offers Azure VM Guest patching and Azure Update Center as the alternate and the upcoming options for patch management.
One of the key challenges in IaaS workload management in Azure is Identity and Access management (IAM). While the common options opted are
Extending the On-Premises Active Directory (AD) to Azure by deployed domain controllers in shared Virtual network.
Using Active Directory Domain as a managed Service from Azure (This is not same as extending OnPrem AD to cloud)
The above two options are not available out of the box and it takes efforts and cost to implement and manage. Also in many cases we shall have non routable Virtual networks or DMZ networks in Azure in which local accounts are used for VM logins.
To avoid local logins, We have a great saviour now in the form of using Azure AD accounts to login to Windows and Linux VMs in Azure cloud. This is currently in public preview as of March 2021.
It just works when enabled properly with no additional cost and infra needed.
Let us see the step-by-step guide to enable Azure AD based login for Windows VMs
Supported Windows version:
Windows 10 1809 and above
Windows Server 2019 Datacenter
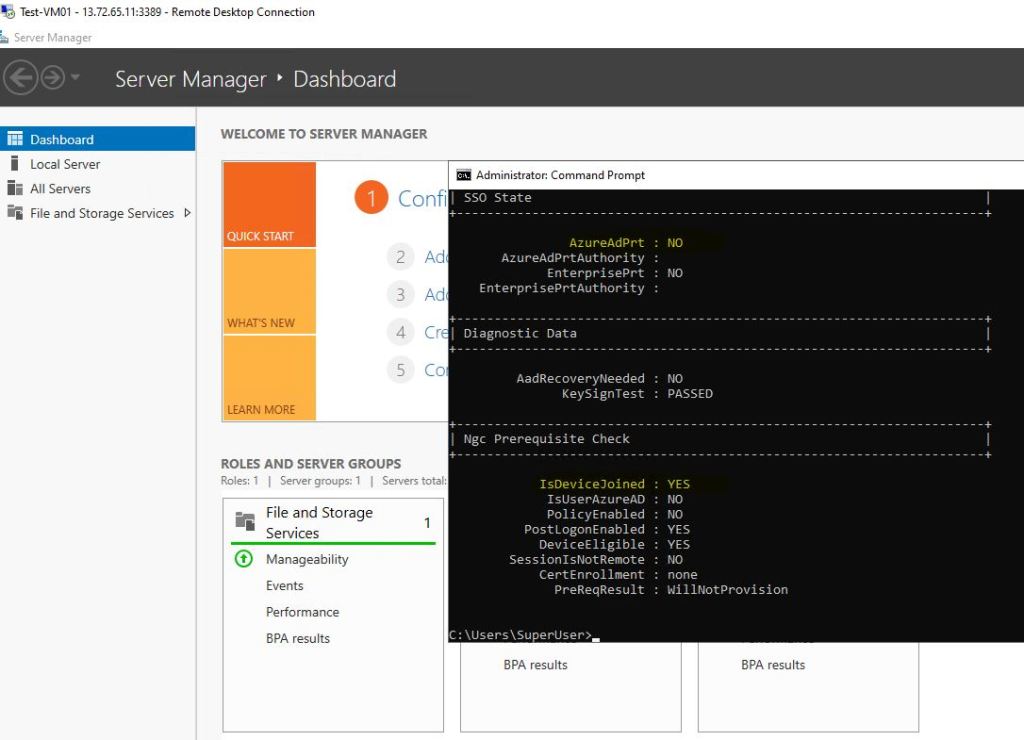
In this lab, I am using my Windows 10 machine in my home network to connect to a Windows Server 2019 VM (Test-VM01) in Azure using Azure AD user account. Both are Azure AD joined machines to the same tenant
Note: The Server 2019 VM is in workgroup and is not joined to any Active Directory domain.
Pre-Requisites:
Both the Windows 10 machine from which RDP connection is initiated should be Azure AD joined or registered or hybrid join (both the host machine and the machine to be connected via RDP should be present in same Azure AD tenant)
Using the command dsregcmd /status(Check for IsDeviceJoined: Yes)
az vm extension set –publisher Microsoft.Azure.ActiveDirectory –new AADLoginforWindows –resource-group RESOURCEGROUPNAME –vm-name VMNAME
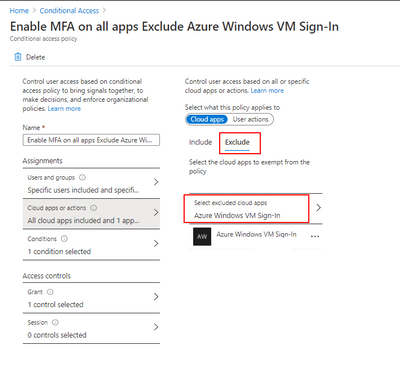
If MFA is enabled for the account, create an exception for Azure AD VM login (Example given below)
Procedure:
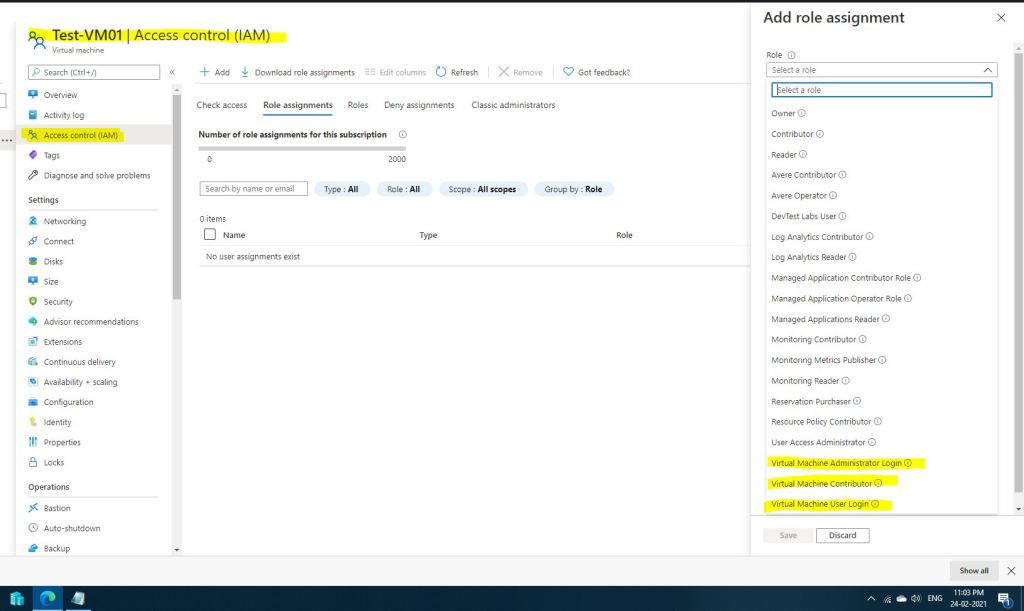
While creating the VM in the Azure portal, select the highlighted option of “System Assigned managed identity and “Login with AAD credentials” under “Management” tab
Create role assignment in the VM properties page (Select one of the roles – Virtual Machine User Login or Virtual machine Administrator Login)
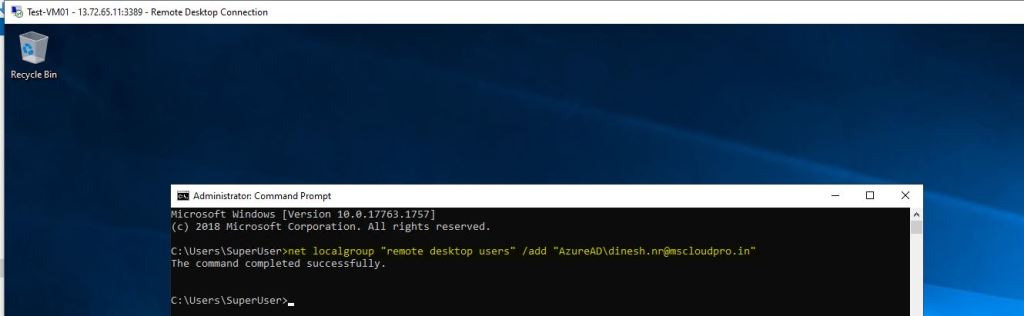
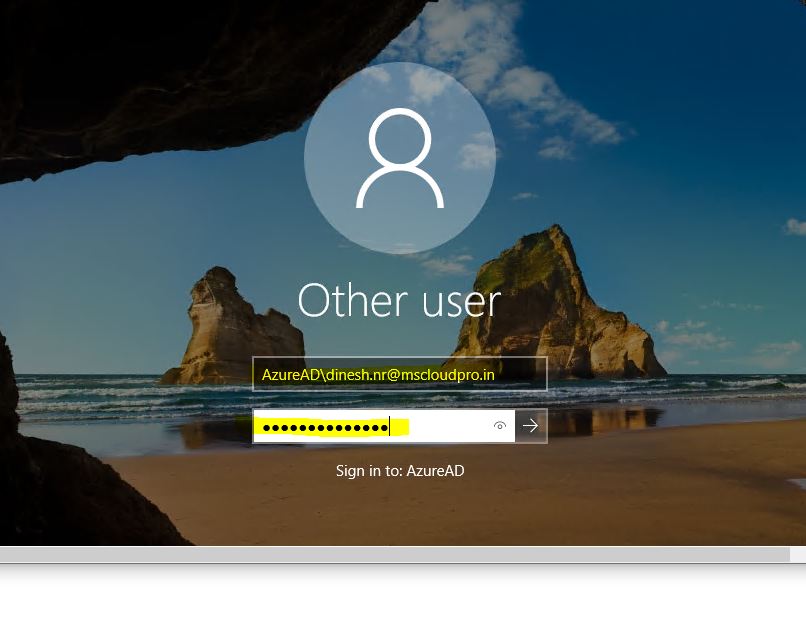
Add the Azure AD user (Dinesh.NR@mscloudpro.in is my test account for this exercise) to the remote desktop users list in the Windows Server 2019 VM with below command
Net localgroup “remote desktop users” /add “AzureAD\dinesh.nr@mscloudpro.in”
Open the shortcut sysdm.cpl and Click on “Remote” tab à Uncheck the option “Allow connections only from computers running remote desktop with Network Level Authentication (Recommended)” and ensure that the user added in previous step is added to remote desktop users by clicking “Select Users” button
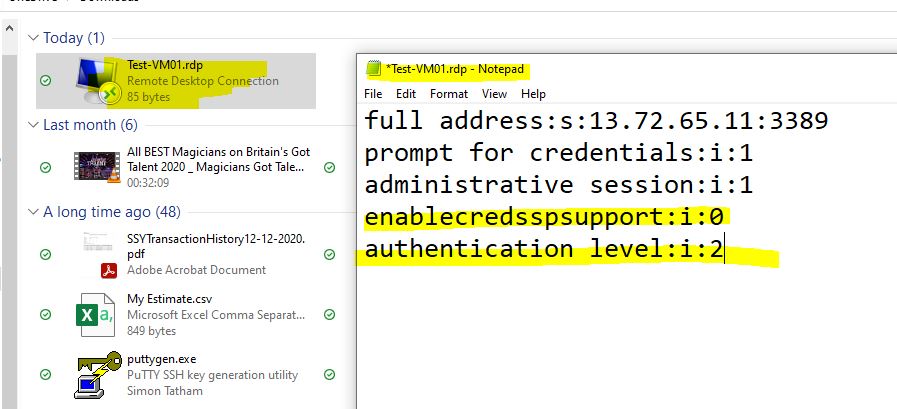
Before connecting to the Azure VM, download the RDP file and append the below highlighted text
We are all good now 😊
Now while connecting to the Windows Server 2019 VM from my Windows 10 machine using RDP, we must use AzureAD\UserName as a login ID and the password for the account. The Azure AD account can be a cloud only account or the account synced from OnPrem AD.
Important Notes:
As an optional, you can add the Azure AD account as a work account in the Windows 10 source machine
We need to ensure that the Windows 10 source machine is Azure AD registered or joined or Hybrid join
All the other steps given in the guide are needed to performed either on Azure portal or the target Windows server 2019 VM
If MFA is enabled on Azure AD account, one of the options is to use strong authentication method like Windows Hello for Business
Azure Bastion host does not support Azure AD based login (As on March 2021)
Due to the multi-tenant nature of office 365, all the tenants in Office 365 by default have a domain name like <Company Name>.onmicrosoft.com.
The customers would like to retain their email address domain name even after migration to Office 365
When we migrate mailboxes from On-Premises to Office 365, one of the first steps involved is to add the domain name (SMTP domain) of the customer in Office 365.
This article describes the step by step approach to add a custom domain name to Office 365 tenant.
The interface of Office 365 has been recently upgraded and I am have followed the latest UI in this article.
STEP1:
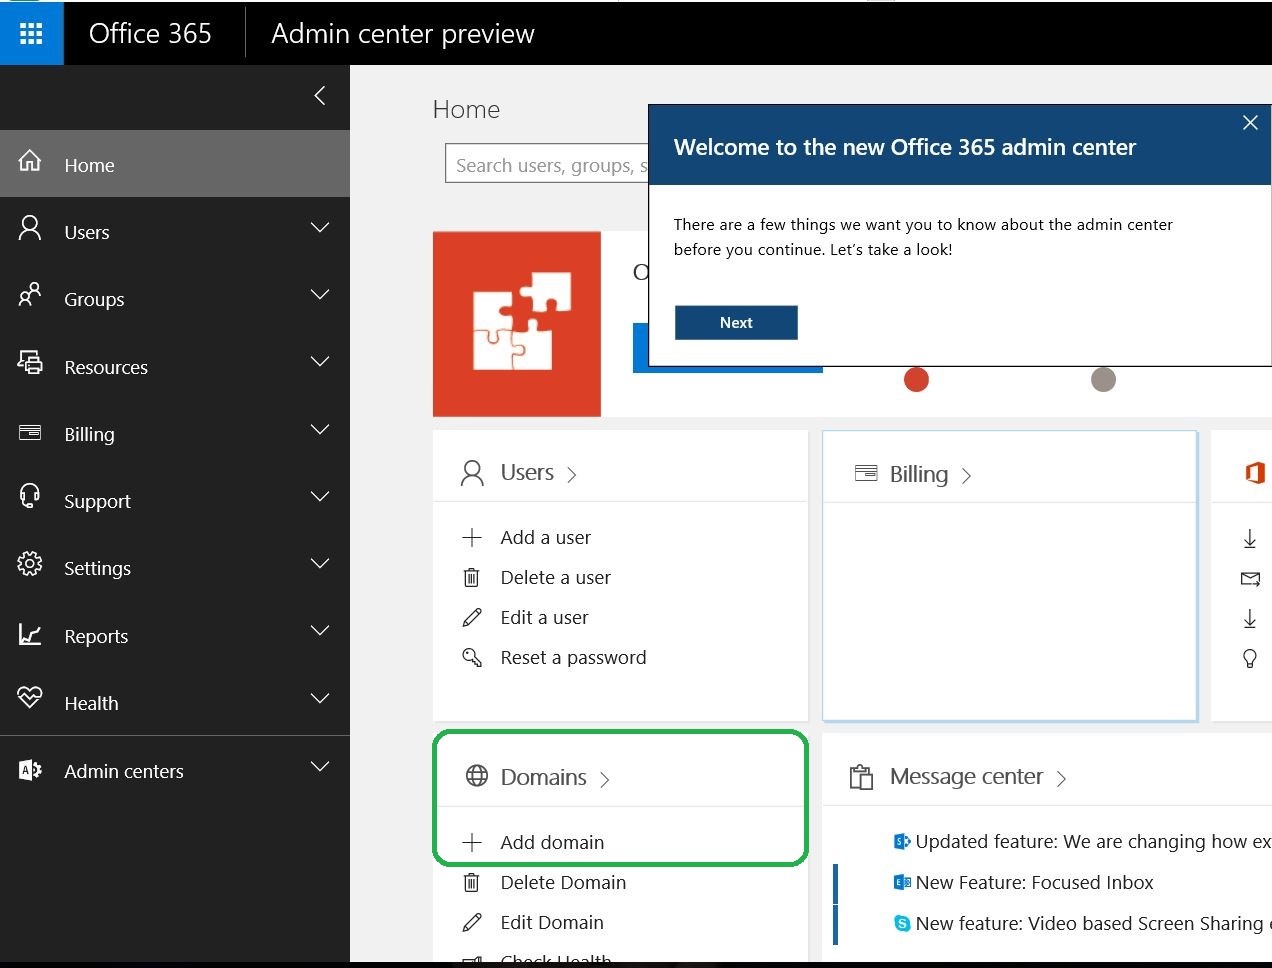
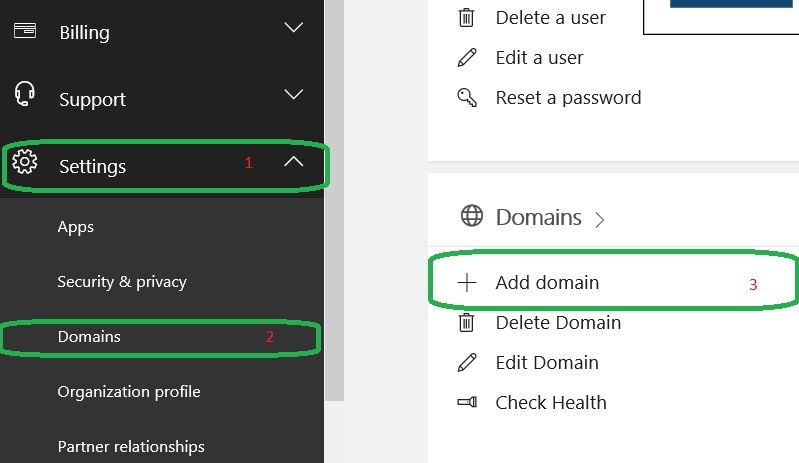
We need to select “Add Domain” option either from “Home Screen” of “Office 365 Admin Center” or from the “Settings” option in the left pane of “Office 365 Admin Center”
Or
STEP 2:
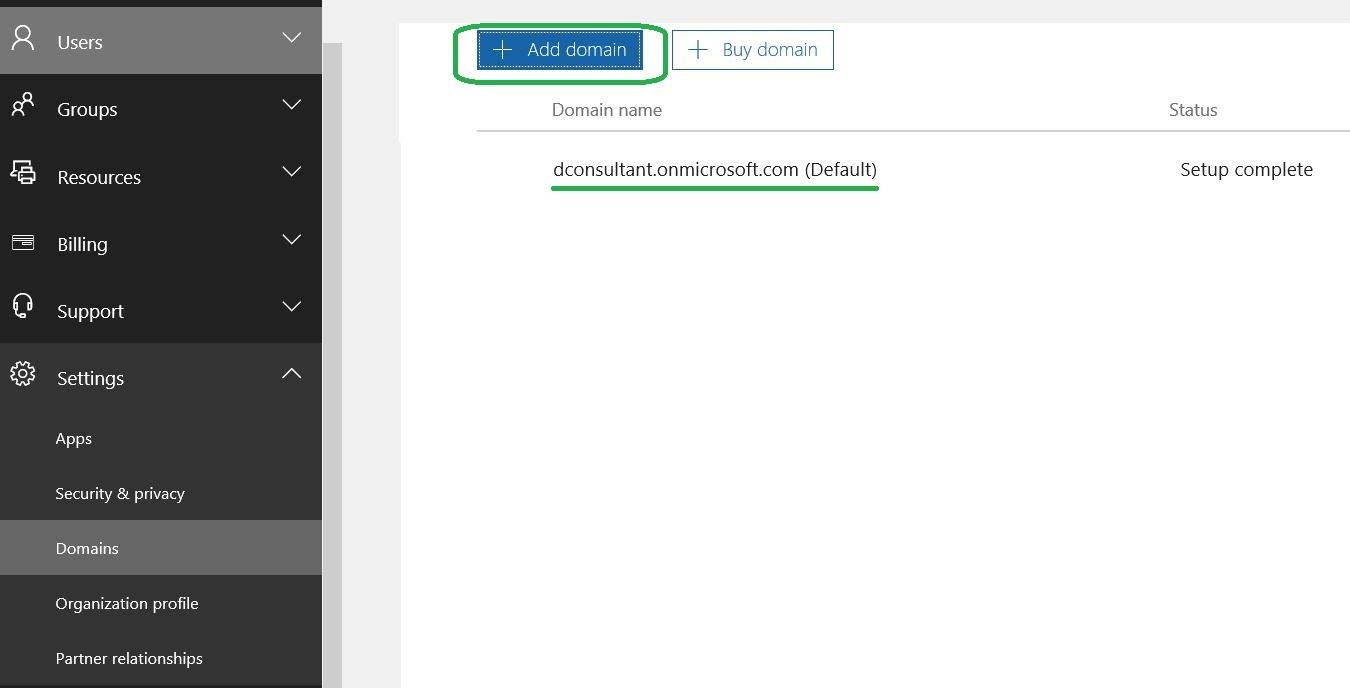
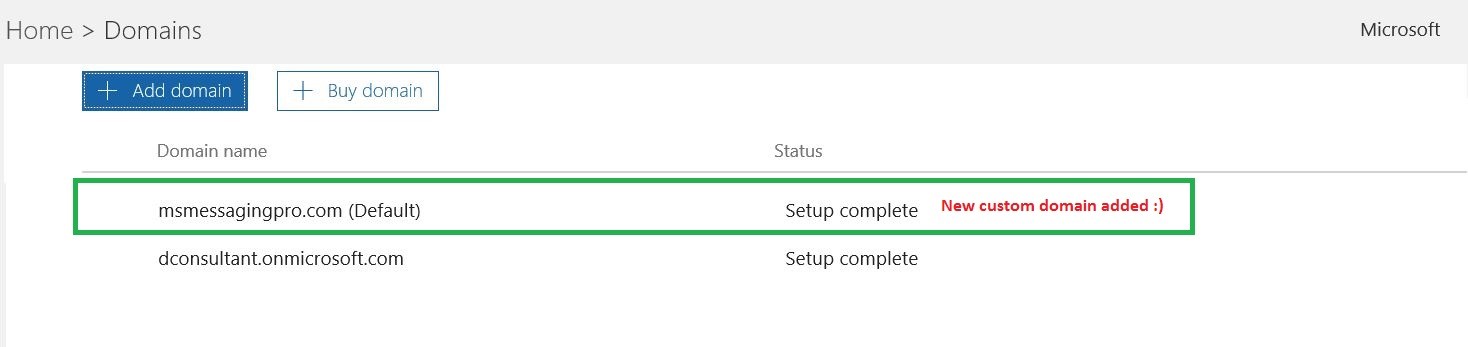
After we click on “Add domain”, we get the below console where the default Office 365 domain name is present. In this case, it is dconsultant.onmicrosoft.com. Click on “Add domain” button in the below console.
STEP 3:
Now the “New domain” wizard appears. It is a fairly simple process in which the below steps are carried out.
Add our custom domain name
Verify that the domain name is owned by the tenant
Setup online services like Skype, Sharepoint, Exchange etc
Update relevant DNS records
In this case, I am entering the domain name as “msmessagingpro.com” which is a domain I own.
STEP 4:
Now the critical part of verifying the domain name comes to picture. We cannot add a domain name to our tenant unless until we own that particular domain.
Hence we need to verify/prove that we own the domain name via below methods.
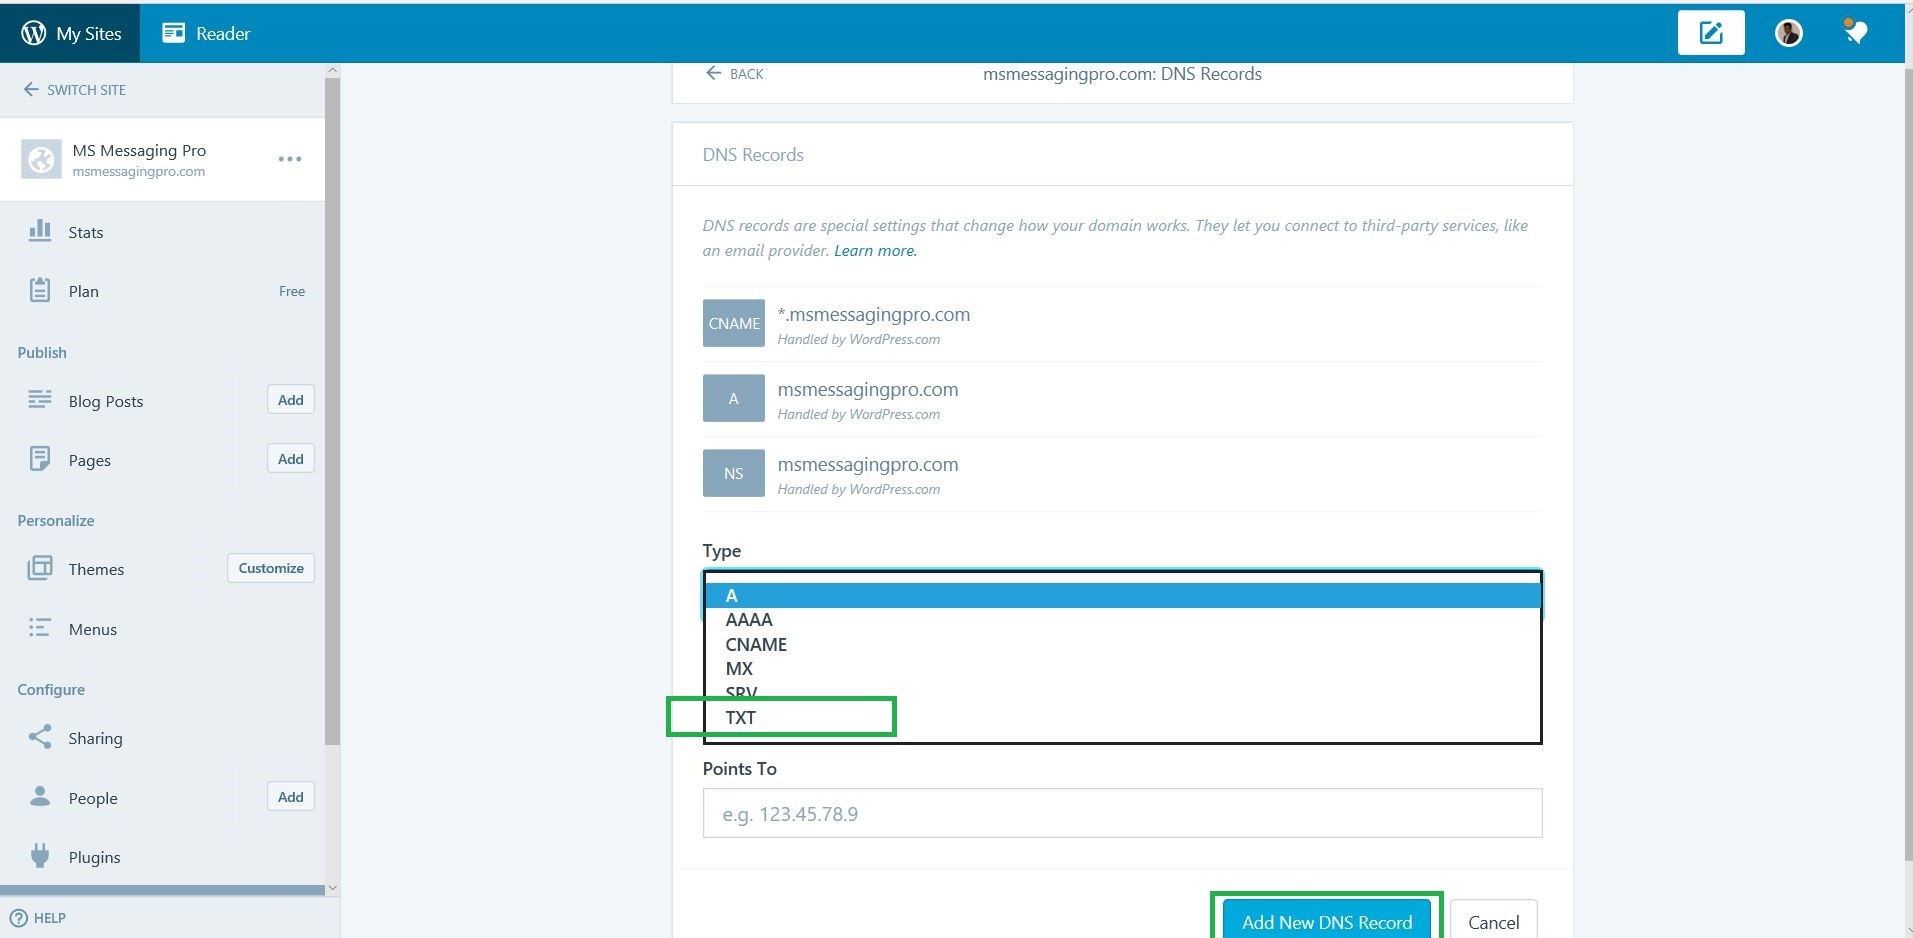
TXT record
By adding a custom TXT value presented in “New Domain” addition wizard on the DNS server of the domain we own. In most cases, we can update the TXT record via browser. In our demo, we will be adding msmessagingpro.com which is a domain name provided by WordPress.com and I own that particular domain.
MX record
This option can be used if we have currently published an MX record under the domain name. This is mostly used if an existing On-Premise Exchange server uses the domain name we are trying to add to the Office 365 domain.
We are going with the first option of verifying the domain name using TXT record.
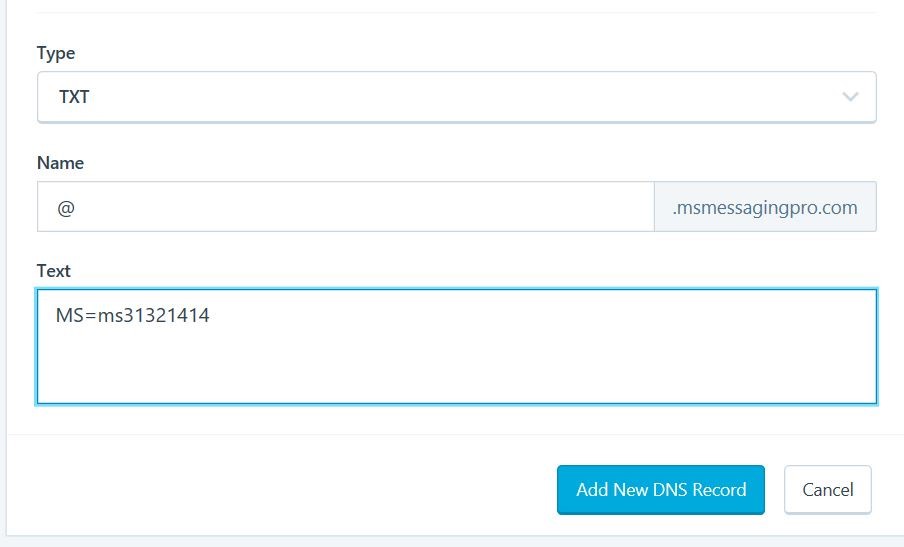
We need to add the below TXT record (MS=ms31321414) to the DNS server where msmessagingpro.com is hosted. Also the TXT record would vary for requests from individual tenants and hence it is unique to your domain.
Before we click on the “Verify” button, we need to add the TXT record in the Internet DNS server. I am going to add the value as given in below snaps which are taken from WordPress.com since msmessagingpro.com is provided to me by WordPress.
Note: You can always click on “Your DNS host” (highlighted in blue in above snap) to check for the various DNS hosts directly supported by Office 365 which will make your domain verification much easier. Unfortunately, WordPress provider is not one among them and hence we do all the steps in this demo manually.
STEP 5:
Adding TXT records in WordPress.com’s DNS server for msmessagingpro.com.
Once the TXT record is added, click on the “Verify” button under “Verify domain” window mentioned in Step 4.
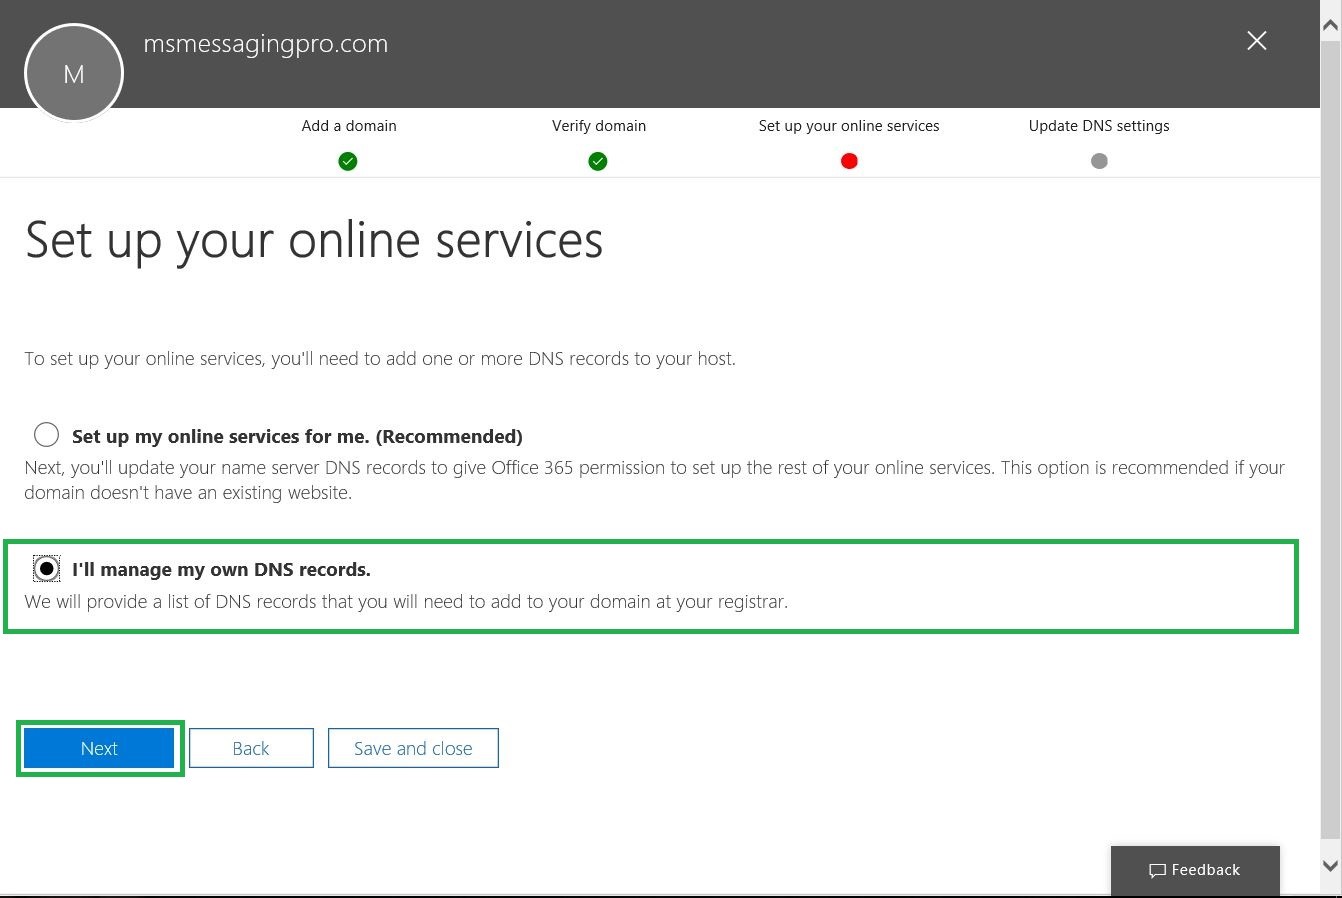
STEP 6:
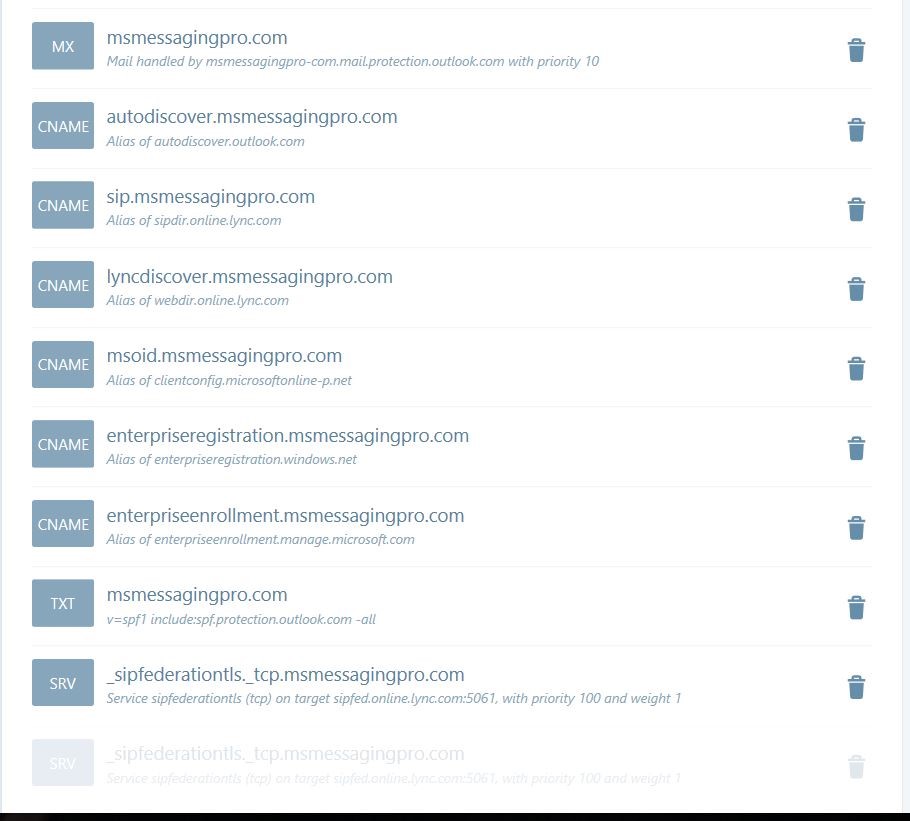
Once the domain name is verified, we need to setup the various DNS records for all the services/offerings provided by Office 365. If we don’t register the below records, the internet mail delivery to the custom domains would be affected.
Since I have a website with WordPress.com, I am going to update the DNS records manually. In most cases if you have purchased the domain from GoDaddy, MyHosting etc, you can go with first option and authorize Office 365 to make the changes directly on the DNS server which is a very easy process.
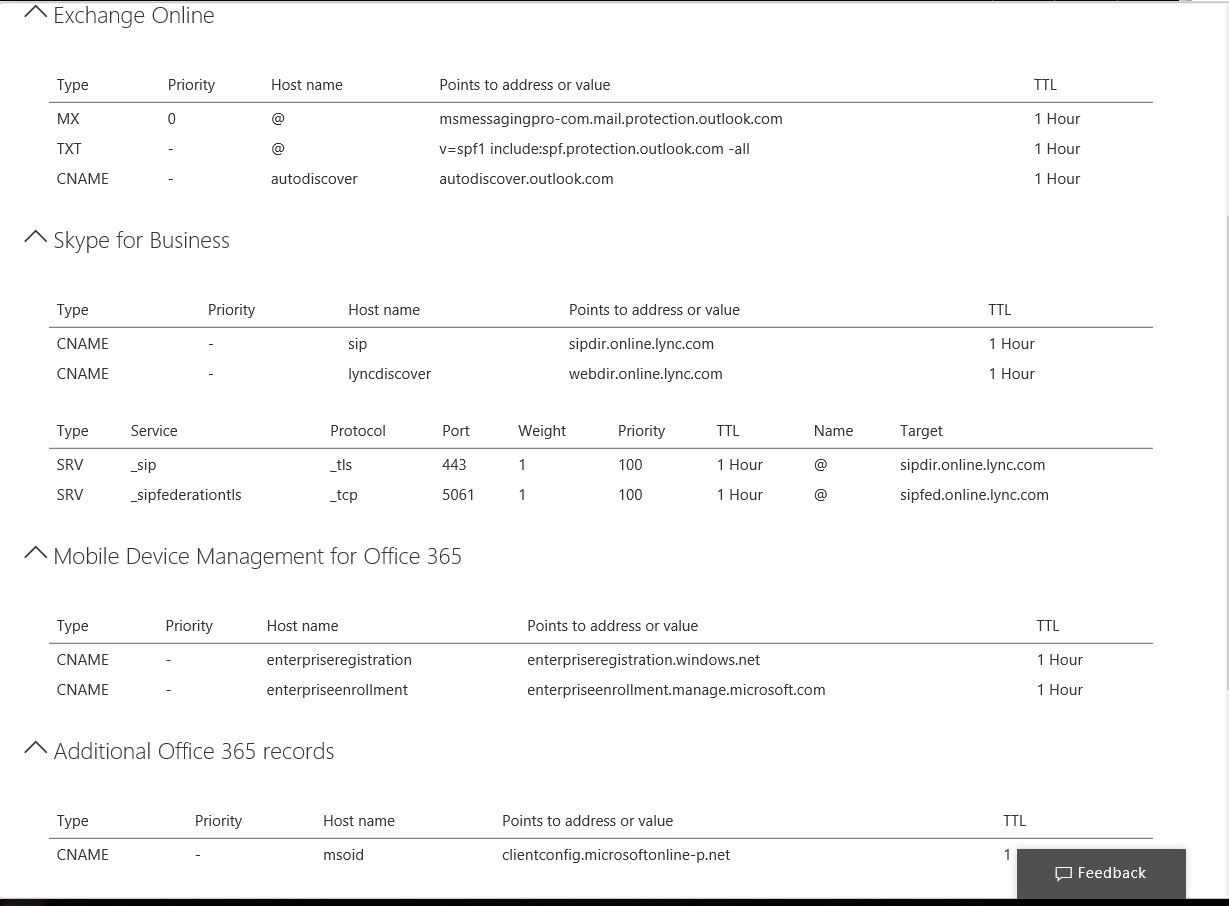
Records Needed for Office 365 Services:
STEP 7:
Records added in WordPress.com DNS server:
For adding records, I have just repeated the steps mentioned in Step 5 but chosen appropriate record types like A, CNAME, SRV etc as mentioned in the above snap.
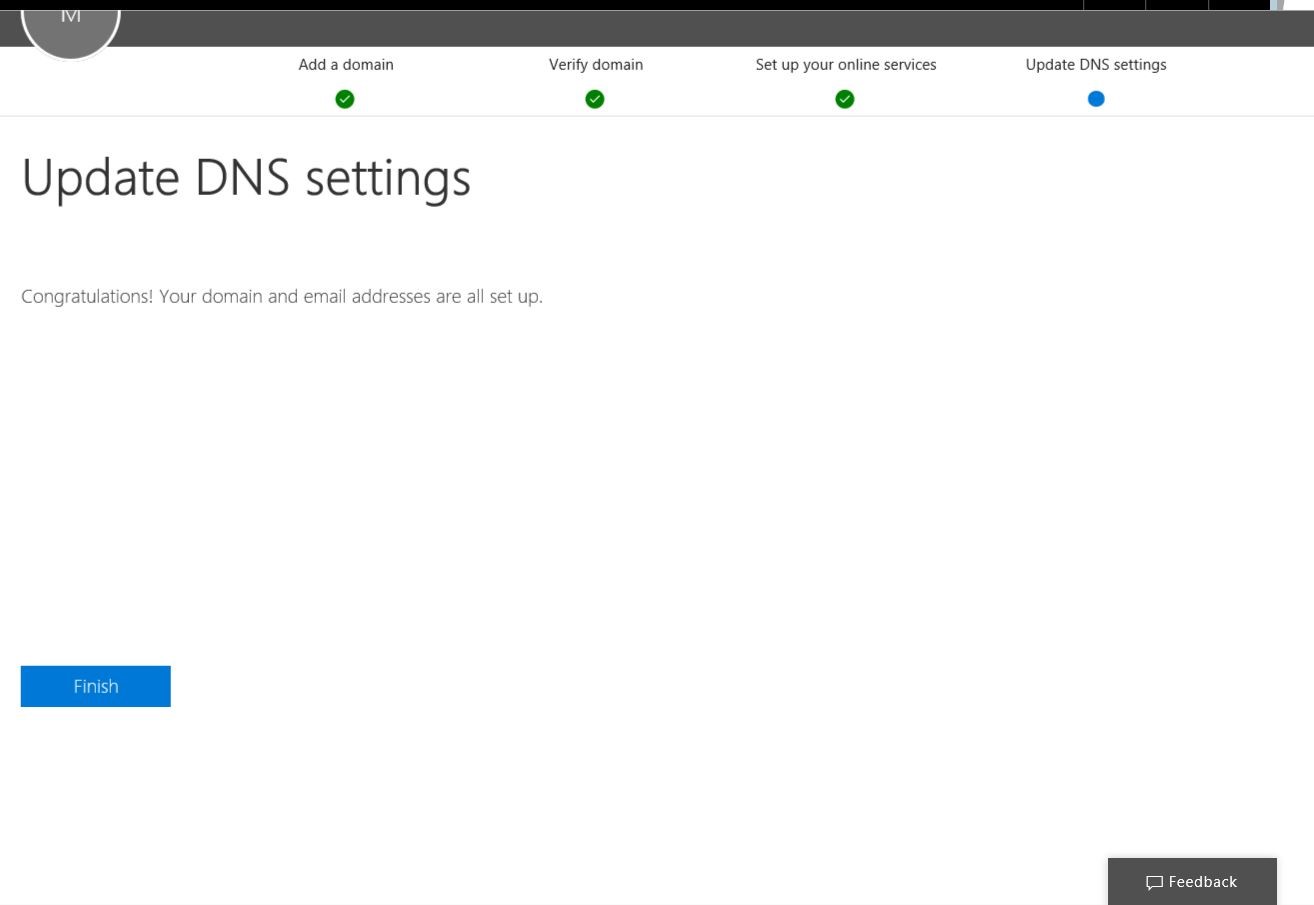
Voila 🙂 We are done 🙂
Final snaps after the DNS records are updated.
In this article, we have learnt how to add a custom domain name to an existing Office 365 tenant.
From an Exchange Admin perspective, We often come across the term “Multi Tenant” when Office 365 is discussed.
Many of us think that Cloud Offerings are Multi Tenant in nature and On premise models are based on Single Tenant all the time. This assumption is very wrong!
Let us explore further.
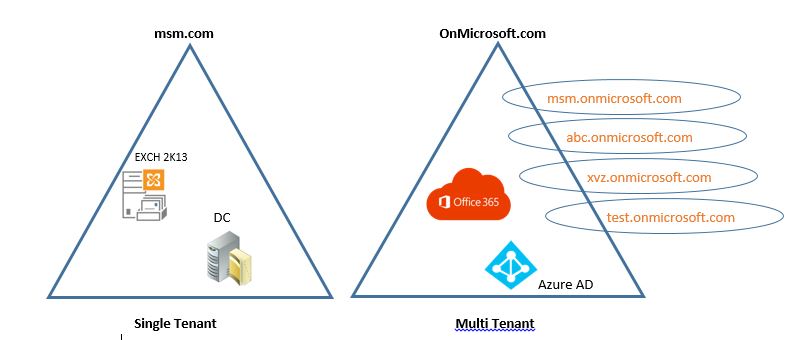
Assume that I am working as an Exchange Admin for an organization named msmessagingpro.com. The organization uses Exchange Server 2013 SP1. This company has two major LOBs as msmessaging and ldkmstech. The AD domain name is msm.com
Half of the employees need to have an email address ending with @msmessaging.com
Rest of the employees need to have an email address ending with @ldkmstech.com
In this case, I can create multiple Accepted Domains, Email Address Policies, Address Books and optionally add UPNs in the AD Domain & Trusts console to create Multi Tenancy in an On Premise AD & Exchange Setp.
In short, multiple organizational units or LOBs depending on a Single Exchange setup will result in the demand for creating Multi Tenancy even in an On Premise setup.
Let us conclude this way ….
Single Tenant:
If an Exchange or On Premise application serves a single organization or having a single accepted domain name will result in Single Tenant Setup. In other words, each customer will have a dedicated Hardware & Software setup.
Multi Tenant:
If an application or Service supports multiple organizations and multiple domain names within the same Infrastructure, we call it a Multi Tenant Architecture. The hardware & Application Infrastructure will be effectively shared among multiple customers. This forms the core concept of Cloud Computing.
Microsoft Office 365 has a common infrastructure which is multiple datacenters spread across various geographies and a common application provided as a “Service” to all the customers. Hence Office 365 implements the concept of Multi-Tenancy.
Hence any customer would have the email address or MS Online User ID ending with .onmicrosoft.com.
Each customer tenant is considered more like an “Organizational Unit” with corresponding accepted domain and email address policy.
Of course we can add “domain names” that an organization owns to its own tenant component. Each admin of the Office 365 tenant will have access only to his own tenant and no access to underlying hardware since Office 365 is a typical SaaS offering
In a series of articles, I would like to share my experience in the process of scaling up to Office 365. The first part of it is to create a Office 365 test Tenant which can be used for learning, providing POC to customer or testing the features of Office 365 in FastTrack mode before migration.
Office 365 – Creating the First Tenant Environment:
In order to learn or scale up in any MS product, we need a lab environment for the same. Traditionally we use a home server or workstation with a high end configuration to host VMs in Hyper-V environment to learn the technology. With Office 365, the traditional approach does not help and many admins are flummoxed about how to start the learning process. I was with the same thoughts before 18 months when I started to scale up in Office 365 to support a customer environment.
Office 365 Lab Setup:
There are three ways to have a lab setup for Office 365.
Free Trial of Office 365 Plans [E3&E5] Offered by MS
Office 365 Tenant simulation available to MPN (Microsoft Partner Network) subscribers
Office 365 subscription coupled with Azure subscription (helps in simulating migration from On Premise to Office 365)
Starting with a Free Trial of Office 365:
The following guide will provide a step by step approach (Just 3 steps) to have a test environment with the help of “Free Trial Of Office 365 Plans”
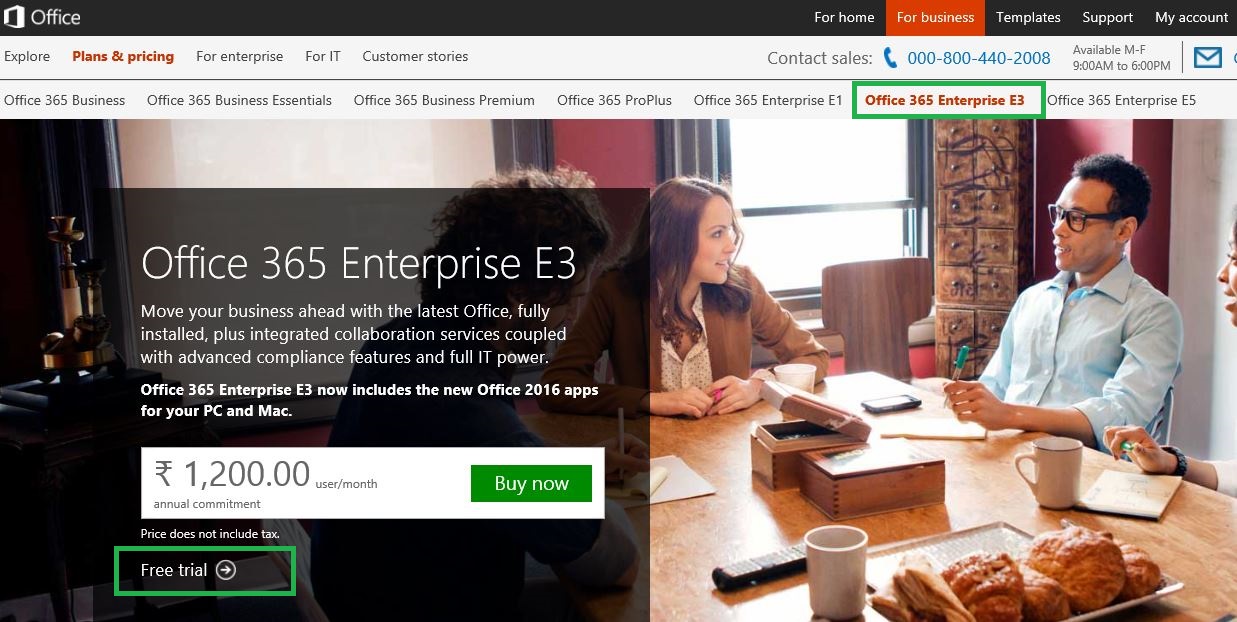
For Enterprise environment, Microsoft provides three different plans of today. (Office 365 Enterprise E1, E3 & E5).
Note: Office 365 E5 plan is released very recently which includes the options for Cloud PBX, PSTN Conferencing & BI tools on top of features offered in E3.
Click on the below link and then click on “Free Trial”. (We shall create a demo environment using Enterprise E3 plan). Refer the boxes highlighted in green for the selection.
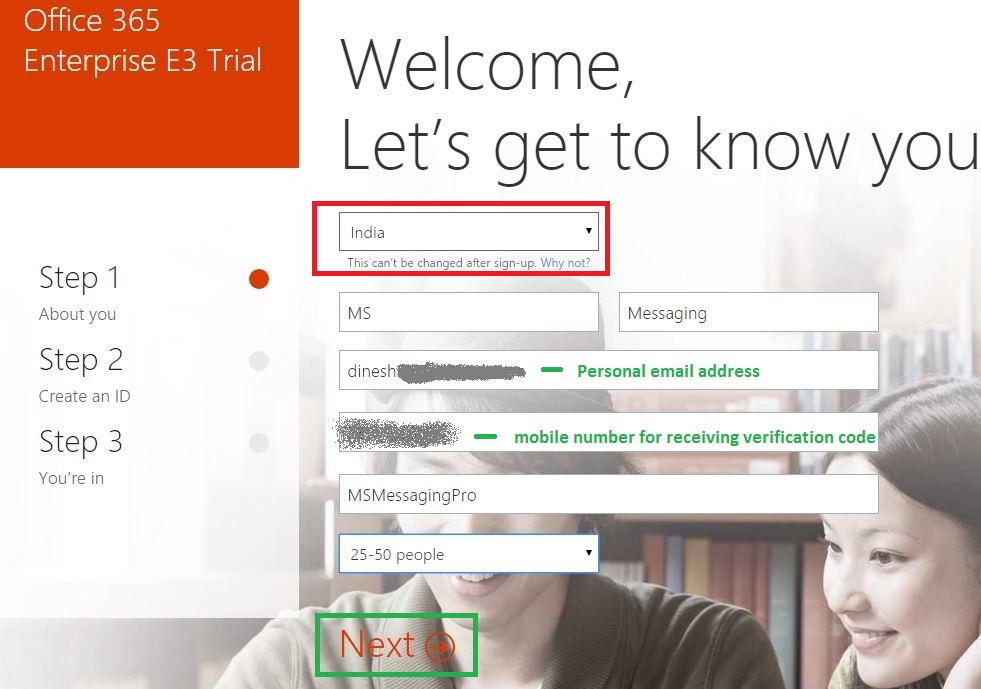
NOTE: Unlike Microsoft Azure trial, You don’t need to provide credit card or any sort of payment information for getting the free trial of Office 365.
Fill in the personal information as needed below as a first step (Step 1). You need a personal email address and a mobile no.
Note: Select the proper “region” from the drop down box highlighted in Red. This cannot be changed once the tenant has been created and this selected region decides the Microsoft datacenter in the same region / nearest datacenter in which the Office 365 mailboxes and User accounts will be kept.
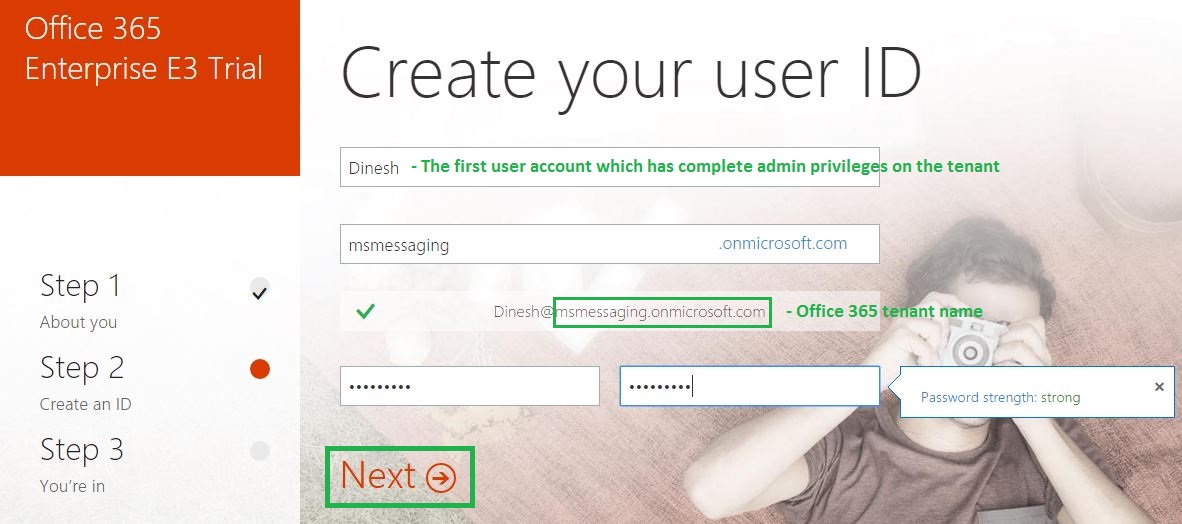
The 2nd step in the process (Step 2) is to create an Office 365 ID or a tenant as given in the image below.
Note: Choose the below information very carefully if you are planning to transition this trial tenant into production setup after testing.
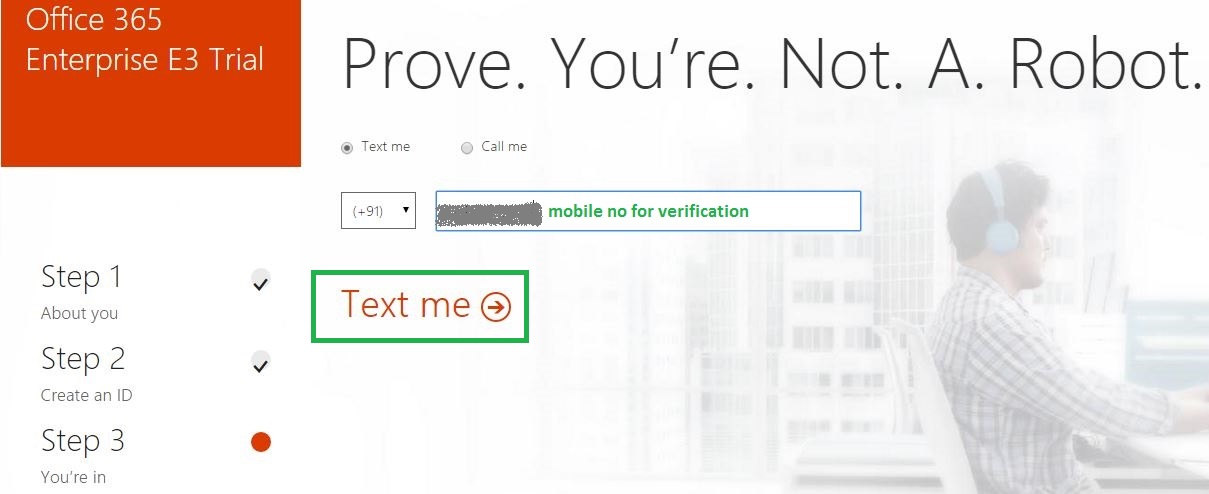
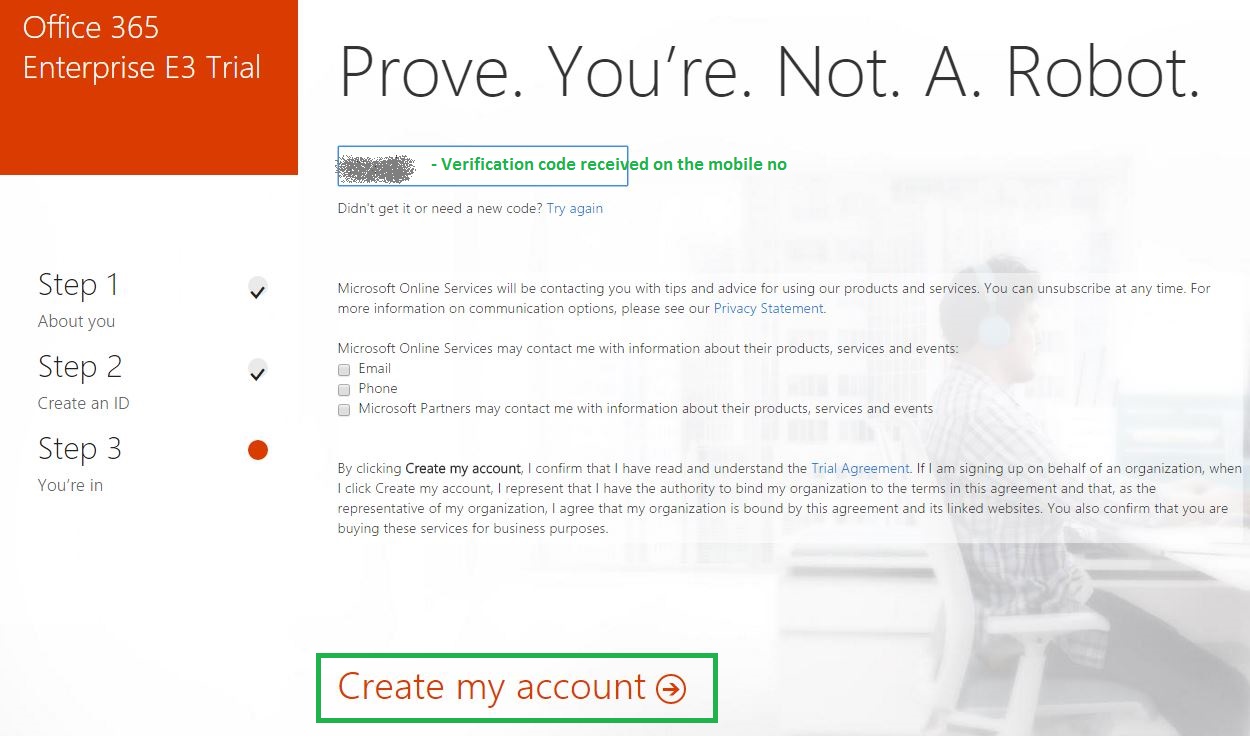
The next step (Step 3) is to verify by providing a personal mobile no and then click on “Text me”.
You should receive a confirmation message in few minutes on your mobile number mentioned in the previous step. Enter the “Verification Code” and then click “Create My Account”
That’s it. We have an Office 365 tenant created. Information is provided in the below snap.
Cloud computing is the buzz word in IT industry now. Every major IT product company is trying to provide the best cloud solutions to its consumers.
Cloud computing can be classified into the below 3 models.
IaaS [Infrastructure as a Service]
PaaS [Platform as a Service]
SaaS [Software as a Service]
A great Cloud offering under the model SaaS from Microsoft is “Office 365”.
In the recent days, I found lot of misconceptions about Office 365 among the Exchange admins and the end users alike.
One of my friends recently asked “what is Yammer?”. One of the organizations recently provided Office 365 business plan subscriptions to its employees and many asked if it would allow them to access mails in their mobile device because the very word cloud means mobile access to many. Most Exchange admins feel that Office 365 is only Exchange Online and they often fail to understand the underlying AD Azure.
So in my words, here it goes ….
Office 365 is a brilliant cloud offering from Microsoft which refers to “subscription plans” that include access to “Office Applications” and major “Productivity Services” that are enabled over the Internet (cloud services) like Exchange Online, Lync Online, Sharepoint Online, OneDrive for business etc.
From an enterprise IT admin perspective, Office 365 has two major classifications:
Business
Enterprise
Business plans basically provide access to Office Applications via Internet to the business users. The applications can be installed (Click To Install over Cloud) in one or more devices (smartphone, tablet & computers) or accessed online via various browsers like IE, Chrome, Safari etc. The office applications included are MS Excel, MS Word, MS PowerPoint, OneDrive and MS Outlook. (Skype for business & OneNote are included in some plans)
Enterprise Plans provide both Office applications & Productivity services over internet. The productivity services from Office 365 are Exchange Online, Lync Online, SharePoint Online, Delve (Information Discovery within Office 365), Sway (Digital story telling app), Yammer (Social network in a professional environment similar to “Facebook At Work”) & OneDrive for business (Cloud Storage like DropBox).
Hence an organization can use Office apps from Office 365 subscription & the email service can be from On-Premise Exchange Server 2013. Some organizations can completely use Office 365.
The authentication for Office 365 users are provided by Azure Active Directory (AAD) similar to Exchange users getting authenticated by On Premise Domain Controllers running Active Directory.
Cloud offerings from Microsoft has picked up a great momentum in the last financial year and it is growing even faster this year. In the last 2 years, I have witnessed 80,000+ mailboxesof an IT organization getting migrated to Office 365 within 6 months and one more organization embracing Office 365 Office apps for the whole organization. A humongous scale of adoption for MS cloud platform clearly indicates the reliability, scalability, business continuity provided by Microsoft Cloud Platform.
The earnings release data from Microsoft release for Q1 FY16 clearly shows the industry acceptance trend for Microsoft Cloud offerings like Office 365 & Azure. A few Excerpts are given below.
Office 365 consumer subscribers increased to 18.2 million, with approximately 3 million subscribers added in the quarter
Office commercial products and cloud services revenue grew 5% in constant currency with Office 365 revenue growth of nearly 70% in constant currency and continued user growth across our productivity offerings
Commercial cloud annualized revenue run rate exceeds $8.2 billion
With fast track deployments and easy to migrate options, Office 365 is equally embraced by Start Ups in India and enterprises across the globe. Thus Exchange Administrators like me are all geared up to embrace cloud faster than ever before having 18.5 million users already in Office 365!
Why wait to experience Office 365 …. Follow the below link …